Announcement

Collapse
No announcement yet.

How to Make a Manzanita Driftwood Centerpiece

Collapse
X
 
  • Filter
  • Time
  • Show
Clear All
new posts

  • How to Make a Manzanita Driftwood Centerpiece

    When buying manzanita driftwood for aquariums, often what is found are groupings of single or double branches. It is hard to find pieces with multiple branches that reach up high enough to be seen above fully grown plants, and when those pieces are found, they are usually prohibitively expensive.

    However, there are many ways in which the individual branches can be put together to create the look of a multi-branch centerpiece. This is one way to do it which I find rather simple to do while also being very stable and long lasting.

    Materials Needed:
    • Manzanita Driftwood - 5 to 6 branches of varying sizes
    • Saw - to cut the wood
    • Slate Tile - I used a 6"x6" piece that was 3/8" thick
    • 1" Stainless Steel Screws - must be SS or they'll rust
    • Drill and Drill bits - for wood and slate
    • Hot Glue Gun and Glue - your regular craft store stuff works fine


    Instructions:
    1. Cut wood. Cut the bottom of each piece of wood so that it has a flat surface with enough space for a hole to be drilled into the center of the wood from the bottom. If the wood is rotten or split, either cut it off or build it up with wood filler so it can securely hold a screw.
    2. Prepare wood. Prepare the wood for the aquarium. Wash it, boil it, whatever you want to do.
    3. Drill holes in wood. Drill a hole in the bottom of each piece of wood. The hole will travel up through the center of the wood. It only needs to be about an inch deep and the diameter that fits the screws you are using.
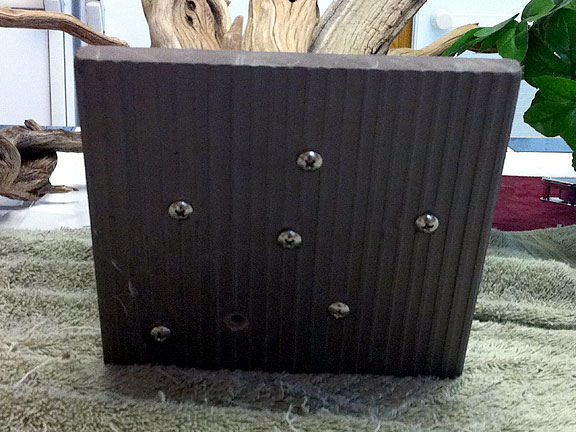
    4. Drill holes in slate. Drill multiple holes in the slate tile. Make the holes slightly larger than the diameter of the shank of the screws so they can be pushed in and out without the threads getting caught. You can experiment with holding the wood in different positions to get some idea of where you want to put the holes, but to be honest, I found that it really doesn't matter at this stage. Just put holes all around the slate tile, and if you really need to change it, you can always add another one later.
    5. Screw wood to slate. Here comes the fun part. Start by screwing in the tallest piece of wood for your back piece. Keep it loosely attached to the slate bottom so it can be turned and twisted, but screw it in enough so that the wood is well supported. Repeat this with all the wood pieces. As you work with the wood, you'll probably move the pieces around until you get the look you want. When you finish, keep the screws loose so you can tilt and wiggle the wood.


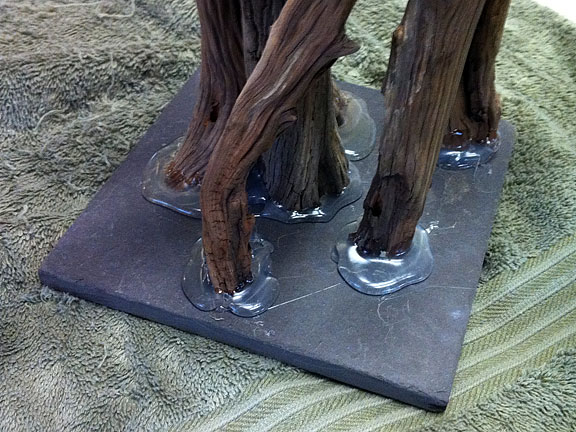
    6. Use glue to shim wood. Use hot glue around the base of each piece of wood. This is when you will make the final decision of the wood's position. If you need for the wood to tilt a little, loosen the screw to give a little more wiggle room, then add more hot glue under the "gap" between the bottom of the wood and the slate tile. Hold this in position until the glue cools (you can lean the centerpiece over and let gravity hold it in place for you). Be patient at this point because the glue is needed to act as a shim. If you move the wood before the glue has set, you'll squish the glue and your "shim" will be flattened.

      Continue to glue each piece of wood. Each time, put a heavy bead of glue all around the base of the wood, then twist the wood so the glue can get underneath it, and then let the glue cool in that position.


    7. Tighten screws. Once all the glue has cooled, it is time to tighten the screws. You should be able to tighten them very securely so the wood is firmly attached to the slate. The glue itself does not actually attach the wood to the slate (hot glue easily comes off of slate), but it acts as a molded shim for each piece of wood so that there are no gaps between the wood and slate. When you tighten the screws, it applies pressure to the glue, and this holds the wood very firmly in place.


    That's it! The centerpiece can now be placed in the tank! Be sure to protect the bottom of your tank from the slate and screws (I recommend using an egg crate under the substrate and driftwood centerpiece). The slate will keep the driftwood in place for years, and the substrate will hide the slate, screws, and glue.

    I hope this method helps someone make their own driftwood centerpiece!
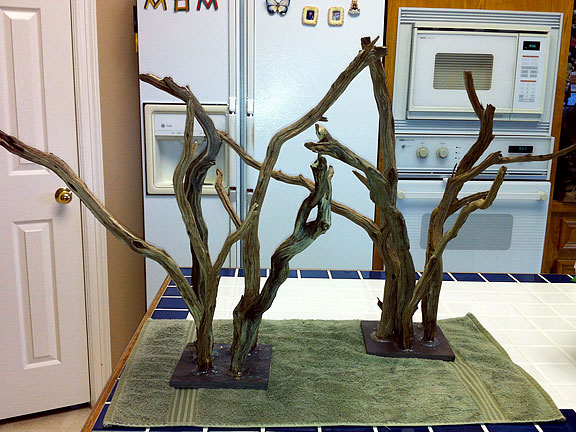
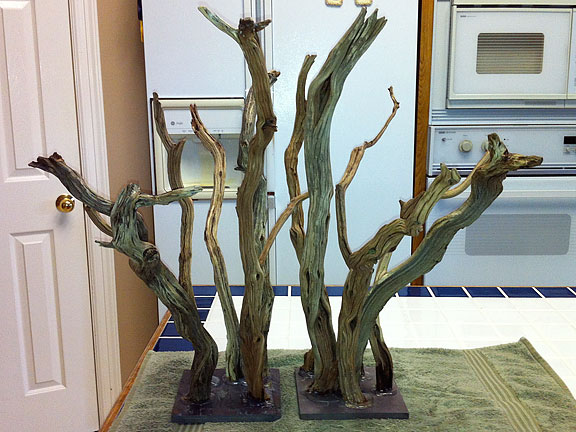
    <-- Front View of Centerpieces

    <-- Side View of Centerpieces
    Last edited by Complexity; 02-19-2012, 04:27 PM.
    Vicki

    • 90g Planted - Journal - New Pics Mar23
    • 75g Planted - Journal (on PT)
    • 29g Planted - Journal
    • 29g Planted
    • 5g Planted RCS


  • #2
    Great thread!!! Wonderfully informative and excellent pictures
    In the land of the blind, the one-eyed man is king.
    Desiderius Erasmus
    GHAC President

    Comment


    • #3
      Thanks! I posted this because I had actually forgotten how I had made my first one years ago, and I couldn't find anything like it online. So when I tried to make another one, I tried to make it two other ways before I got my old one out of my 75g tank and saw how I had made it. Once I saw how easy my original method was, I thought I'd go ahead and post this in case it helped someone else.
      Vicki

      • 90g Planted - Journal - New Pics Mar23
      • 75g Planted - Journal (on PT)
      • 29g Planted - Journal
      • 29g Planted
      • 5g Planted RCS

      Comment


      • #4
        Nice!! Where can I buy some Manzanita Drift woods? Can you make me 2 of them just like yours?

        Comment


        • #5
          There are various places where you can get the driftwood. Look online, on ebay, on aquabid, and on the "for sell" forums here, on plantedtanks.net, on aquaticplantcentral.com, and most other aquarium related forums.

          As far as me making them, I'm sorry, but I don't have enough free time to make these for others. But they're really not hard to do, and because you get to move things around a lot before you finally glue it in, you can experiment with different wood placements until you get the look you want. And even then, if you really hate the final product, the hot glue is easy to take off of the slate and wood so you really can start all over again.
          Vicki

          • 90g Planted - Journal - New Pics Mar23
          • 75g Planted - Journal (on PT)
          • 29g Planted - Journal
          • 29g Planted
          • 5g Planted RCS

          Comment


          • #6
            Can I use aquarium safe clear silicone?

            Comment


            • #7
              Yeah, but why would you want to? It would take forever for it to dry when hot glue takes only a couple of minutes.

              Hours vs. minutes.

              And keep in mind that you sometimes have to wait for one branch to cool (or dry) before moving on to the next because you have to hold the branch in place so the glue isn't squished inside the gap. With something like silicone that takes hours to dry, the process can drag on for days.
              Vicki

              • 90g Planted - Journal - New Pics Mar23
              • 75g Planted - Journal (on PT)
              • 29g Planted - Journal
              • 29g Planted
              • 5g Planted RCS

              Comment


              • #8
                Alright! thanks for the info.

                Comment


                • #9
                  You're welcome!
                  Vicki

                  • 90g Planted - Journal - New Pics Mar23
                  • 75g Planted - Journal (on PT)
                  • 29g Planted - Journal
                  • 29g Planted
                  • 5g Planted RCS

                  Comment


                  • #10
                    Got any pics of these in place?
                    Tell your boss you need to go home to take care of your "cichlids." It sounds an awful lot like "sick kids." )

                    Comment


                    • #11
                      Awesome, Vicky!

                      Thanks...I think I will be trying this in the near future. You just saved me so much arranging/propping/frustration!
                      "I think that God, in creating man, somewhat overestimated his ability." -Oscar Wilde

                      Comment


                      • #12
                        Originally posted by TonyO View Post
                        Got any pics of these in place?
                        I just put one in, but the water is cloudy so it's not a good time to take a pic. I'll try to get one later when the dust settles.

                        Originally posted by LooksLater View Post
                        Awesome, Vicky!

                        Thanks...I think I will be trying this in the near future. You just saved me so much arranging/propping/frustration!
                        You're very welcome! I hope it does help! Be sure to post a pic when you build yours!
                        Vicki

                        • 90g Planted - Journal - New Pics Mar23
                        • 75g Planted - Journal (on PT)
                        • 29g Planted - Journal
                        • 29g Planted
                        • 5g Planted RCS

                        Comment


                        • #13
                          Very nice work.
                          150G Tropheus Moorii Ilangi
                          125G Tropheus Moorii Ilangi
                          115G Tanganyikan

                          Comment


                          • #14
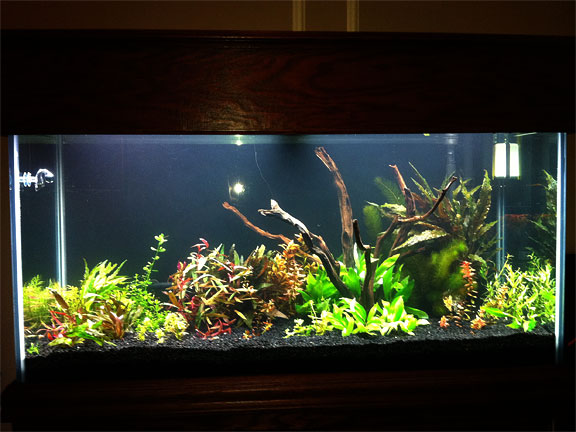
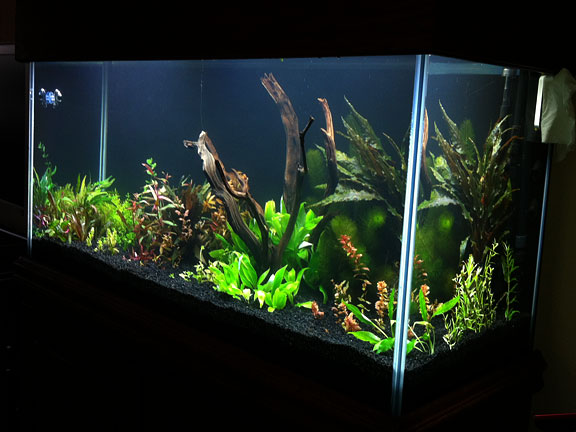
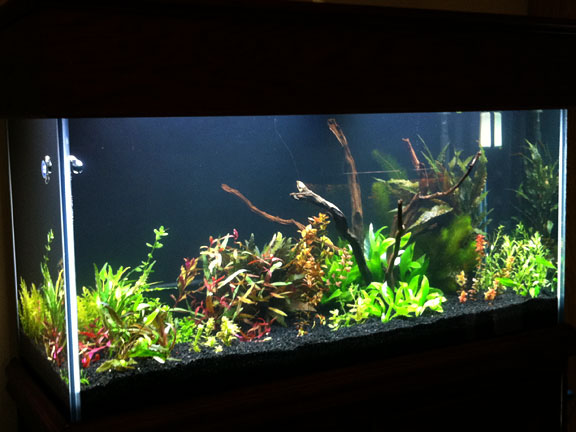
                            The tank is still cloudy and this tank is not truly planted (the plants are in there merely to stay alive, not for aesthetic purposes) so these pics are really horrible, but it gives some idea of how the driftwood looks like in the tank.

                            When I've had the driftwood spread out more sideways, it ends up getting swallowed up by my plants. So that's why I point my pieces more upright. Plus, I love watching the amano shrimp hang onto the branches and catch food when I feed the fish.

                            If you follow the link to my 75g journal in my sig (goes to another forum), there are pictures of my first centerpiece. Those pics are much better than these.


                            Vicki

                            • 90g Planted - Journal - New Pics Mar23
                            • 75g Planted - Journal (on PT)
                            • 29g Planted - Journal
                            • 29g Planted
                            • 5g Planted RCS

                            Comment


                            • #15
                              Vicki it looks just lovely.
                              All bleeding stops eventually...

                              Comment

                              Working...
                              X