Announcement

Collapse
No announcement yet.

William's Plant Tank Adventure/Journal

Collapse
X
 
  • Filter
  • Time
  • Show
Clear All
new posts

  • William's Plant Tank Adventure/Journal

    A preface to the journal - I have been a member of several online fish boards for many years. During that time I have had a slew online mentors who took the effort to teach me what they know - so in reality - I am a copycat of information, assimilated from people much smarter me. Every blue moon, I stumble across an original pearl of wisdom but more often then not, I just have an ability to comprehend proven concepts from people who are much smarter than me. I was keeping this journal on a larger board but am so tickled to have found a growing local group I feel compelled to share - like a 12 pack of coke for the chance to quarry one's own limestone on a members aunts' property - with the hopes it might help someone locally in their endeavors.

    Best regards,

    William

  • #2
    William's Plant Tank Adventure/Journal

    Preface:  I started planning this project a month and a half ago and actually put it into motion a couple of weeks ago. I am early enough into the project that I feel it still merits an online journal. Hopefully I will have the journal up to date in the next week so that all entries are real time and not transcriptions of hand scribed notes and scattered thoughts.

    Project:  Planted Tank – William’s Journal - Entry 20061129

    Objective: An efficient large scale planted tank allowing long term concentration on the fluidity of the flora and fauna while still having the flexibility to expand and explore new hardware options.

    Implementation: Off the shelf systems, performance and aesthetics carry weight over cost effective DIY function. Nothing, wrong with DIY, I actually enjoy this aspect of the hobby, sometimes down right revel in it, but this is a center piece the living room and I would prefer spending time armpit deep in the tank  I will reserve DIY brainstorms to the friendly confines of my home office, where the audience is more forgiving. That said I plan on peppering the project with tried and true DIY techniques assimilated over the years and new ones when situations dictate.

    Tank – I really wanted a 210 gallon footprint (72x24x28) Oceanic tank that I worked on at the LFS. After some poking around and asking questions from 4 long time LFS owners in the Houston area I came to the conclusion, based upon recent experiences, that Large All-Glass aquariums (+120 Gallon), have a much lower failure rate off the floor then Oceanic.  On two visits I was shown large Oceanic tanks prepped to go back to the distributor due to seam failures. The gist I came away with is after Oceanic was bought out by All-Glass and the plant shut down in Dallas excess suspect inventory is seeping into the local market.  If it was one LFS that told me this, I would raise an eyebrow as I have always had excellent results with Oceanic tanks.

    After hearing the same dialogue repeated the only decision left is drilled dual overflow or standard aquarium. The drilled tank is intriguing, I can pipe the internal connections with black PVC intake and output, and pipe down externally to a large Eheim classic canister or pond filter. Plus if I ever want to try saltwater I’ll have a ready made tank. After thinking it over for a few days, I decided on the standard aquarium. While I liked the fact that the black PVC filter piping would blend in nicely with a black background, I want to keep the initial DIY to a minimum and have reservations with fixed hardware in the tank. I could always cap the holes and remove the overflows – more work and who am I kidding - if I ever get around to doing saltwater it will be a decade before I would attempt it on this scale.  

    Decide to go with the 215 (72x24x29) All-Glass standard tank from a local shop (Fish Land).

    Stand and Canopy - An initial application – I actually thought about DIY – after reflecting the amount of effort involved and tools I don’t have at this time, I forfeited this option and looked into buying off the floor stands or custom built. Oceanic off the floor stand and canopy which fit the tank footprint and desired look cost more, then the tank itself. I decided to have the LFS build the stand for me. Andy at Fish Land has been building his own stands for years so I have no doubts about structurally integrity. I’m more concerned with the look of the carpentry. Andy’s stands range from bare bone frames to rustic skinned stands. After explaining to Andy that I wanted an upgrade over his standard, he assures me he can build a stand to my liking at a reasonable price. Having dealt with Andy for several years and knowing how much business I have sent his way, I am confident he will deliver.  

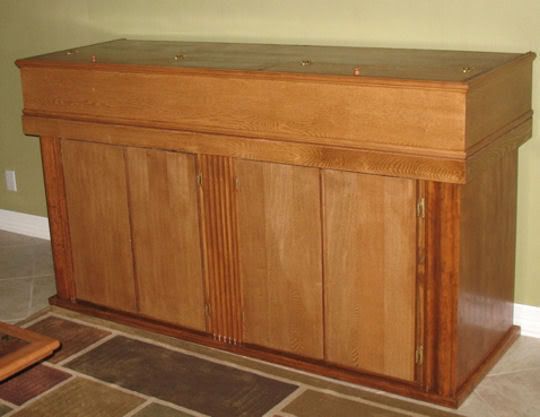
    Wooden stand and canopy built by Fish Land.

    Filtration - Not much to think about here. I’m an Eheim homer. The only decision was which model/flow rate. After reviewing specs, reading user comments on various Ehiem filters I decided to go with the Eheim Professional III. The flow rate (with media) 440 gallons per hour is acceptable for a moderately stocked planted tank that is maintained on a weekly basis. I like the fact that it has dual intakes this should improve the overall circulation of the tank. This feeling will be hard to measure in finite terms but I’m sure I will be able to see the effects of this application based on previous experiences.  

    Eheim Pro III w/o Media, Fish Land.

    Lighting - One hardware application I have always used off the shelf products. Do I have the ability to mount a reflective shield, wire and install ballasts and end caps, yes I do. Do I have the patience and confidence in my skill sets to manufacture this aspect of the project in a presentable manner to my discriminating mind’s eye, no!  I will fall back on my tried and true CoraLife light strips. The first thought that comes to mind is the 72” Metal Halide/PC fixture. I ran the 48” version on a 75 gallon planted tank. Amazing solution when the lights are properly elevated and fine tuned with timers. After a bit of thought, I realize this wasn’t the best approach. The halides run very hot, there is no way I can safely stuff them under the canopy. I could ditch the canopy and mount the fixture on legs. Been there done that on the 75. The heat produced in the summer pushes water into the upper 90+ range. The new house has very high ceilings so I can’t use that mounting product, time for of a different approach. I decide to go with two 72” Lunar Aqualight fixtures. If this isn’t enough light, I do have concerns since it is 29” deep, I can add two 36” single linear strips at a later date. Andy could order these strips for me but he doesn’t have the inventory to swap out a few of the actinic blue fixtures. This is a job for Danny at City Pets.

    2 CoraLife Aqualight fixtures, City Pets.

    CO-2 - With the Eheim Pro 3 I can run two separate inline CO2 reactors, without disrupting the tubing. I’ve been curious for a few years about the effectiveness of DIY CO2 reactors versus off the shelf brands, which I will test once the tank is up and running. This redundancy will be used in conjunction with dual CO2 tanks. Not sure at this point if I am going to need both tanks online at the same time but the wielding shop I get my refills from is only open Monday through Friday and is quite a distance from the house. With my work schedule it usually takes me a few weeks to get a refill so a second tank will be a nice luxury. For regulators I will use JBJ’s all in one solution (regulator/needle valve, solenoid, and bubble counter). Reactors will consist of tried and true DIY PVC reactor and an AquaMedic 1000. I have always wanted to employ an electronic PH Monitor on a planted tank; I think I’ll give one a whirl.  

    2 20lb Steel CO2 Cans, Williams’ Alloy and Welding Supply.
    1 American Marine Pinpoint PH Controller, Online Vendor.
    2 JBJ Regulators, City Pets.
    1 Aqua Medic 1000, City Pets.
    1 DIY Reactor.

    Substrate - I am leaning towards a tried and true favorite SeaChem Red fluorite. I like the results I have had in the past with the product and I like the look. During my queries I discovered the City Pets is now selling the ADA product line so I need to do some more homework as this might be an option. That’s a bit down the road for now so I’ll leave the substrate open for now.

    Fauna – I’m leaning towards Altum Angels, a nice school of Tetras (to be determined), a couple of colonies of Apistos (to be determined), and mop up / clean up crew as needed.

    Auqascape – thought process under construction.

    Lots of work ahead, I am looking forward to starting this project.

    Comment


    • #3
      William's Plant Tank Adventure/Journal

      Project: Planted Tank – William’s Journal – Entry 20061211

      Intro: Sitting down and putting some thoughts to paper in an effort to get this journal up to speed before I lose my hand written scraps of paper and details fade from my memory. Luckily my progress has been methodical at best so I can probably catch up in this entry.

      Timeline:

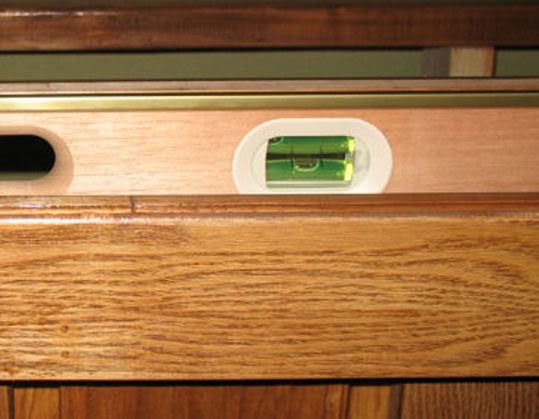
      20061106 – Andy phoned and the tank and stand were in the store and holding water. I stopped by after work. A four foot level across the length of the tank was true and a 2 foot level across the width left, center and right held true as well. Seals look good, no leaking or seepage.

      20061108 – Phoned Andy and asked him how the tank was doing. Everything is looking good, no leaks, weeping or seepage. I instruct Andy to have the tank drained and ready for pickup the next evening.    

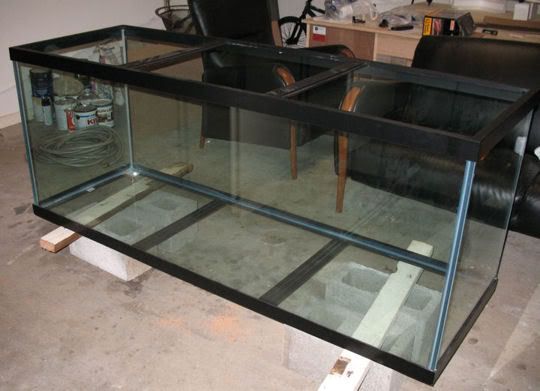
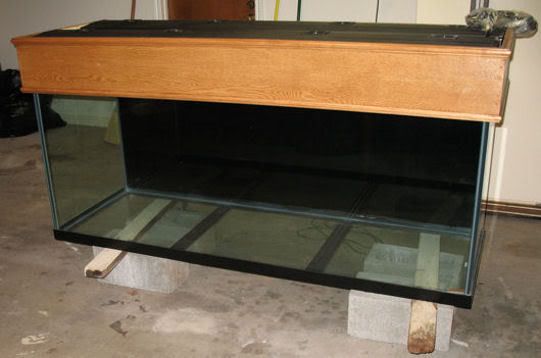
      20061109 – Took delivery of tank, stand, canopy, and Eheim Pro III. It really didn’t hit me how big the tank was until my son and I tried to manhandle the tank out of the back of the pickup into the garage. We successfully moved it from the bed to a cinder block cedar plank temporary holding stand but when we get around to moving it into the house I will be sure there is a pair of hands on each corner of the tank as it is very heavy!

      Tank -


      Canopy and Stand -


      20061118 – Took delivery of the CoraLife light fixtures and JBJ regulators from Danny, City Pets. He swapped out two of the actinic blue bulbs for 10,000K’s. I really like helping LFS’s like City Pets out. Competitive prices, sure I could have saved a few bucks on the internet, but I won’t get service like swapping out bulbs at no charge.

      Hardware Issues:

      As I start accumulating pieces of the project, I realize while I had a good plan in my head, it needs improvements, and there are some obvious oversights that need to be addressed.  I would rather slow down and take my time getting as much of it right before I progress to the next level – an immovable fixture in the living room.  

      Canopy – I have never had one before and my lack of experience in this area has been accentuated in the poor choice of lighting I selected for this part of the project. I have always been fixtures atop glass lids or suspend them via legs or cable roof mounting. Simply place the lights and go. Well it’s not that simple in this application. I need to disburse the heat and a capped top just won’t do in the long run. Somewhere along the line I ditched the idea of DIY lighting in the canopy and decided on the more expensive “easier” off the shelf solution. Looks like I have some DIY “adjustments.”

      On an aesthetic note it really bugs me that the canopy trim is about a ¼” short of the aquarium bracing. I need to address this when I adjust the canopy.

      Tank - Not much to do here other the paint the background.

      Stand – It leveled true in the LFS and did the same on the floated tile floor of the house where it will rest. It will be interesting to see how it levels out once the filled tank is resting on it. Oh well that’s what shims are for.


      Looking at the stand, it’s not an exquisite piece of furniture and not a bare bones Oceanic pine stand, rather a ‘tweener, a solid build, decent finish, and some creative molding. It’s a good value for what I paid but I want to improve the function of it.

      I want to deck and vinyl tile the base, skin the interior frame, install shelves, set eye-bolts for securing the CO2 tanks, replace the door hinges and install door handles.  

      Progress to Date:

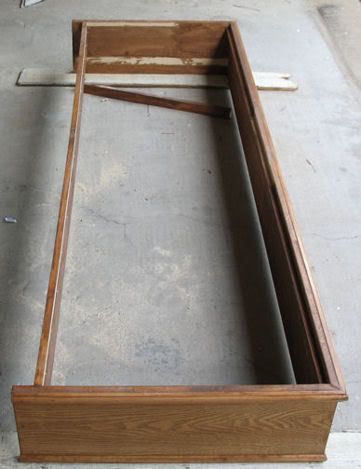
      Canopy - With a jig saw I cut out the plywood top of the canopy (I’ll use this wood for skinning the interior frame or the shelving).   I removed the 1.5” x .5” interior wood strips that support the canopy atop the tank frame,


      replaced the strips with 2” x 4” and capped the 2” x 4” with the original 1.5” x .5” support wood. These modifications resolved the following issues:

      1) With the plywood top removed I can safely run the CoraLife fixtures without worrying about overheating issues.

      2) Replacing the canopy tank support raised the light fixture around 4.5” above the water surface, so glass tops shouldn’t be required, reinforced the width of the canopy and adjusted the height so the aquarium bracing is no longer visible.  

      I still wasn’t happy with the wiggle in the canopy, so I decided to buttress the rear length of the canopy frame with a 2” x 4”. This really tightened up the frame and I am confident the instability caused by removing the tensile strength of the plywood has been addressed.

      Tank – This is a no-brainer, couple cans of spray paint and good to go….. I wish!  It was actually a very frustrating process. I managed to get 98% (1 can of paint) of the rear glass painted in a day, all that was left some light spots and trimming around the top bracing edge. I left the “small” detail work sit for a week. My first attempt at finishing up the job resulted in the paint forming snowflake raised patterns separating the finish from the glass. Since I was working on the upper trim, I attributed the raising to my holding the spray can at awkward angles thus dispersing to much aerosol and not enough paint. Once it dried I scrapped off 1” swathes around the effected areas, clean the glass and repainted careful to hold the can level. Again the painted bubbled in raised snowflake patterns. Getting a bit disgusted I threw the spray paint away and bought a new can. Cleaned up the spots in question and repainted, voila, Houston we have a painted background! I wasted too much time on this portion of the project but it’s done.

      ]

      Stand – I have cut plywood planking for the floor of the stand.  In hindsight the error of my approach smacks like a 2x4 across the forehead. I did all my measurements and cuttings on a contiguous piece of plywood. Fool heartedly; I planned to manipulate the complete flooring into the interior of the stand. After a few goes I realized this just wasn’t going to happen in the confines of vertical bracing in the rear, the door placement in the front, and the restricting 2x4 framing atop the stand. To add insult to injury I realized two of the cuts for the rear bracing where mistakenly cut on the forward side of the floor, cuss, cuss, cuss! Oh well lesson learned, planking was cut in half and new slots cut for the rear bracing. I will square the erroneous cuts in the front of the floor and plug with plywood. There are a few gaps that will be covered up when I skin the interior frame.  Once tiled no one will be the wiser.


      Upcoming Work:

      Stain the unfinished/exposed pieces of the canopy, complete the stand’s interior skinning. I was really hoping to have this work all done by the end of the year, hmmmmm….. I wonder?

      Comment


      • #4
        Re: William's Plant Tank Adventure/Journal

        Project: Planted Tank – William’s Journal – Entry 20070101

        I was really hoping to have more progress to journal by the start of the New Year but my recent work schedule has been brutal and coupled with the holiday season I just didn’t have much time to devote to finishing up the details I want to address before I actually start setting up the tank. Sometimes I get frustrated concerning the lack of time I have had to work on the stand and just think I’ll slap it together so I can get it up and running.  In the end common sense wins out and I dismiss these thoughts – this is the perfect time to customize the stand…. Must be patient!

        Timeline:

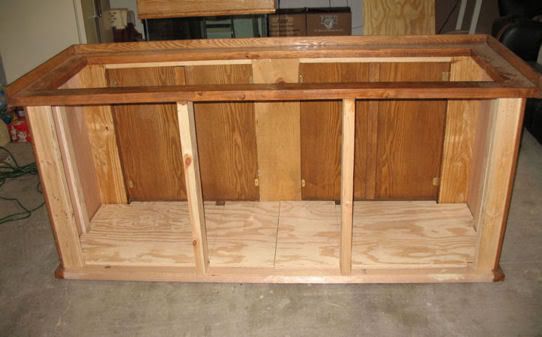
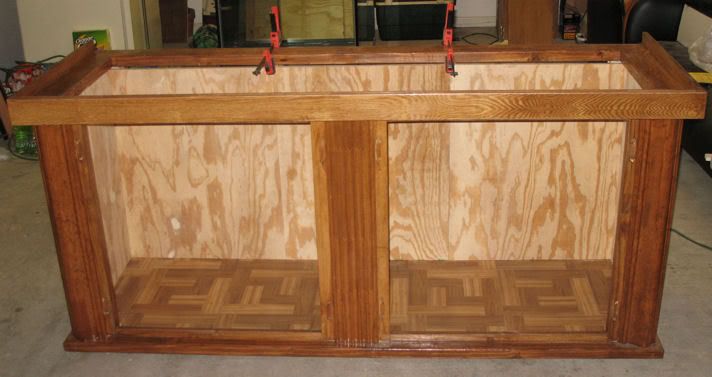
        20061231 thru 20070101 – Removed stand doors, fastened down the planking, plugged the erroneous gaps and vinyl tiled the floor.

        I cut all five pieces for the interior skinning. This ended up taking more time than expected. The process would have gone much faster with a table saw but all I had at my disposal was a Black and Decker work bench, circular saw, a heavy gauge speed square, a few clamps and a couple of levels. I managed to work out a system with the square, levels and clamps that secured the plywood to the table and served as a guide that allowed me to make cuts that squared up even though the stand was a smidgen under 1/8 of an inch out of square.  

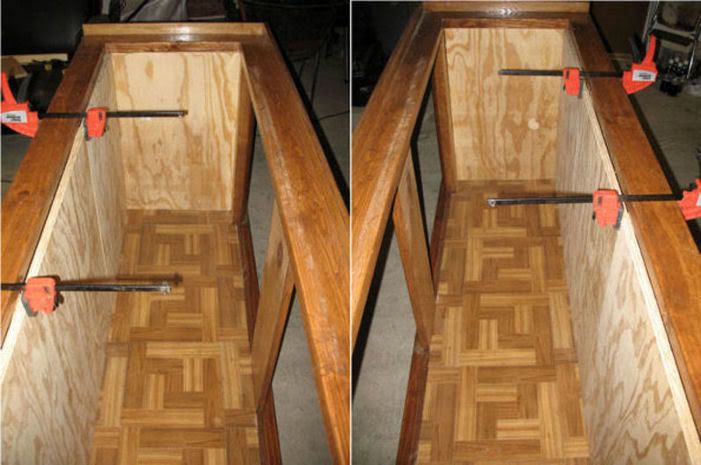
        The rear framing of the stand is such that the corner 2x6’ posts run the length of the stand and the interior 2x4’ posts run the width of the stand. The offset between the two is 1/4 of an inch and a shim here and there. Measured, leveled, cut and numbered all the pieces needed to level/squared the corner skins.

        Cut, fitted, sanded, and stained the center beam which interior stand lighting will be attached.

        Here’s a look at the progress to date:

        Front photo -


        Side-by-side photos – left and right prospectives -


        Upcoming Work:

        I have warned the Mrs. Now that the holidays are over and I won’t be heading to the field again until early February if you need me I’ll be in the garage….

        Stand doors –

        Cut/prep/stain molding
        Decide/purchase hinge/knob set, hmmm polished nickel or matte black?

        Interior skin –

        Drill pilot holes
        Drill/cut filter, CO2, and power cord entries/exits
        Prep – wood filler and sand
        Stain and lacquer
        Cut/sand/stain – dowel rod plugs (for counter sunk screws)
        Cut/sand/stain – molding
        Mount lighting support
        Decide/purchase interior lighting application

        Shelving –

        Decide whether I will use prefab or build my own which is well within the realm of possibilities given the 3/4 inch skin. Decisions, decisions…..  I’m leaning towards fabricating my own. It’s a bit more work, more restrictive then off the shelve products, but would flow better with the all wood stand. I am going to have to think about this one and the efforts required. I’m sure I’ll figure out which direction I will take while prepping/sanding/staining each 28x24ish piece of the interior skin.    

        If I can get the interior done by the end of next weekend, I’ll be elated. A friend gave me a junker TV for the garage and with Pittsburgh out of the playoffs, there is very little that will distract me other then the occasional great play.

        Comment


        • #5
          William's Plant Tank Adventure/Journal

          Project: Planted Tank – William’s Journal – Entry 20070428

          As always time is the enemy in getting this project up and running. Since my last update I spent 7 weeks in the field. I really enjoy California, but the unscheduled trip delayed getting this tank up and running. The good news is that I was frugal on site and banked nearly all my per diem so the final high-end items I really wanted for the tank are no longer an issue.

          Photo of work to date:


          Under the hood:


          Timeline:

          20070101 thru 20070428 –

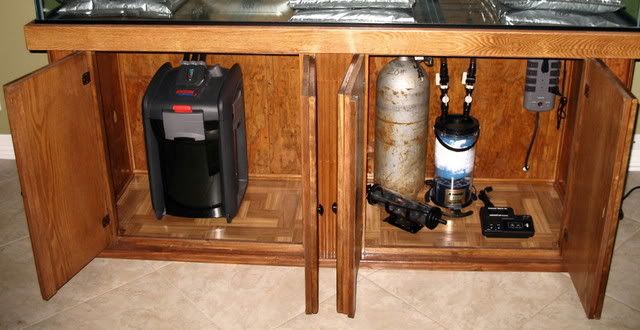
          All of the stand work (minus the shelving) is complete. I held off on the shelves, as I wanted to see how all the hardware fit into the cabinet. In hindsight this was a wise decision as I stumbled across an obstacle that needed to be corrected before I could proceed.

          Issue - CO2 injection:

          Originally, I measured the Eheim 3 tubing/ AquaMedic CO2 reactor inline, with the filter on the ground. I have since floored the stand and instead of the gentle arch of tubing running inline to a horizontal reactor I had a serious bend. In some ways, I was relieved, never real keen running a reactor horizontal (even though I have seen the configuration run at the LFS successfully for the better part of a year) however; I had to figure out a proper solution. A few thoughts popped to mind:

          1) Attach a plank of plywood to the back of the stand and mount the reactor. This would work but defeat the purpose of easy access to eyeball the CO2 injection and removal for cleaning up. I nixed this idea.

          2) Run 4 in tank diffusers, I have seen firsthand 100 gallon tanks thrive with dual diffusers and successfully ran a 75 with a single. The problems I foresaw with this application, long-term maintenance – pulling out the ceramic diffusers every few weeks and sanding them down would be a real pain. A cosmetic problem with this solution is all the extra hardware in the tank and I want to limit the amount of visible hardware in the tank.

          3) My final solution was to run a tried and true Marineland Magnum 350 as a reactor and backup filter, which I opted for. Idea is to run it primarily as a reactor and when needed add filter media like Purigen or the Diatom filter cartridge.

          Aftermath -

          I should have taken this tact from the start, but was just bound and determined to try out the AquaMedic. I failed to digest the length of the reactor cylinder 10.5” (13.5” with ribbed intake/output nipples) and there is no way to secure the unit in a vertical position inside an enclosed stand (unless it is very, very disproportionately tall). I even tried to run it inline on the Magnum 350 and after adding cut off valves I still had to run the unit horizontally with kinks in the hose, which IMHO defeats the purpose of diffusing the CO2 up through the bioballs @ at a normal filter flow rate. A vertical solution in my application could be achieved but one of the main drawbacks would be it would be in the center rear of the tank and I could not access it without draining and moving the tank – that’s a potential disaster in the making. All is not lost I’ll use this piece of equipment on my future 75 or donate it to a deserving soul at one of the local clubs.  

          Issue – Canopy:
             
          As I mentioned in a previous entry this is my first attempt setting up a tank with a canopy and my lack of experience continues to be brought to light under the glaring CoralLife application.  

          Ok tank and stand are done, Yee Haw! Lets cap the tank and turn on the lights, ready to roll right? No….. My application stinks while the reinforcement of the canopy is solid the interior wood stain really sticks out like a sore thumb versus the black background of the tank when viewed from couch/easy chair level. Even worse, all the wires running from the lights to the power strip inside the stand are a major eyeball distraction. Add to that the two-inch gap, I so cleverly included in the back to run filter intakes, etc. shows the green, wall behind it.

          Solutions:

          Painted the interior wood black, call me retentive, but I like the fact that my keen eyeballs can’t discern the difference between black painted wood/background and black zip ties securing hardware.

          Installed a power strip on the rear 2x4 bracing to clean up the lighting/wiring issue. A few drilled holes here, some zip-ties there, and all the lighting wire is above and behind the tank with one power cord entering the stand. Beside the cosmetic factor this fix has a practical application. It allows me to disengage the canopy from the tank with one simple unplug inside the stand.

          Still scratching my head on the 2” gap I installed on the rear of the canopy. I have a few rough ideas floating in my noodle but need to put more serious thought into the detail before implementing a plan.


          Triumphs to Date:

          I updated my journal!

          Did I mention the stand is done?  I am quite pleased with this part of the project. I put quite a bit of effort (read thought and sweat) into it. The flooring and paneling was worth the effort.  Despite the fact it rendered CO2 diffusion limiting, it provides a level stable base for contained hardware, affords tidy plumbing of filter tubing and all the electrical connections, has split light that pivots 180 total degrees lighting up the extreme points of the interior and all that lay in between, and provides an overall neat/clean appearance.

          I am quite happy with the mitered molding on the doors, and while a spent too much time looking for a decent set of pure brass hinges and knobs, the end result is a big improvement over the gold painted zinc set that came with the stand.    


          Remainder of the major hardware has been purchased –

          Interior stand lighting
          Magnum 350
          American Marine Pinpoint PH controller

          Substrate Resolved:

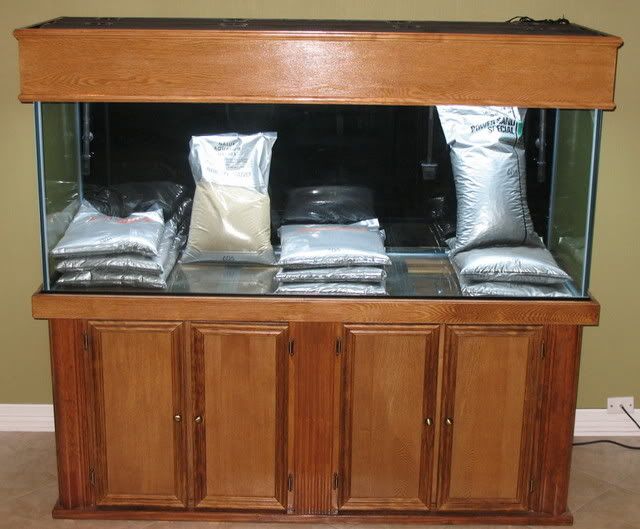
          I finally decided on a substrate. Over the past five years I have tried several applications - blasting sand (silica) with mulm, fertilizer tabs, and laterite, Sea-Chem Fluorite, and Eco-Complete. I have employed each application enough to appreciate the strengths and weaknesses and to me this doesn’t quite fill the bill of the brave new world I venture into. I want something different, something new to understand how it works, a new medium revealing benefits and limitations. I opted for the ADA product line and last week took delivery of 18 liters of large power sand, special, 72 liters of Amazonia aqua soil, and 15 kilograms of bright sand. From prior experience with substrate and eyeballing the volume I currently have I suspect I may need another 8 liters of aqua soil and 8 kilograms of bright sand. For now I sit pat on the conservative approach and see how the granules fill out the aquascape.

          Upcoming Work:

          Hardware –

          An issue that I can foresee being a problem in the future is removal of the canopy to access the inside of the tank for routine work. Currently my wife and I have been lifting and placing it on the floor. In the interim this is acceptable but a long-term solution is needed as my honey-do’s far outweigh my wife’s. ;-) I am contemplating a hoist system, manual or motorized, that lifts the canopy high enough to clean up the interior and prune the aquascape. I need to ask around and see if any other hobbyists have tackled this issue.


          Decide, Driftwood or Rock -

          Originally, I had in my mind’s eye, a layout designed around driftwood. For the life of me I can’t find any suitable pieces locally. I have seen some large intricate Malaysian root pieces but to make them work would take quite a bit of hacking on my part and defeats the purpose of a rather pricey investment. I hear whispers that ADG is getting a shipment from Japan but I’m concerned the amount of material I need will make it cost prohibitive. Mike at Fish Ranch has four containers in the works so he tells me, but he told me the same thing a when I first started this project.  I have perused countless online vendors but am very leery ordering pieces I can’t visually inspect and feel. I have been scouring the local bayou but it moves to fast to retain smaller intricate pieces leaving behind unsuitable stumps and logs/

          I could give Iwagumi a shot. There are plenty of rock yards in Houston. The problem is that a majority of the material is cut for landscaping purposes and doesn’t look very natural in the tank. I’m still open to the idea and need to visit some of the better yards, as I haven’t been to any over the past two years.

          Whatever path I venture down I have a general idea of the flora and fauna in mind for each application. I need to come up with a final list and see what I can get locally and online.

          A driftwood tank will be more complex and diverse on both fronts. Plants will range from foreground plants like glosso, hair grass, or pygmy chain sword, migrate into mid-ranged crypts, culminating into a background of stem plants and perhaps a sword or two. The driftwood will be dressed with a moss, java fern, and perhaps a rhizome or two of Anubias. The fish in the tank will also be more diverse then an Iwagumi tank. Top of the chain will be either wild altums or discus, followed by a harem or two of apistos, a mid-sized school (50ish) of tetras, and a mop up crew of a smaller pleco, some oto’s, and shrimp.

          An Iwagumi will be much simpler in stocking but more complex in rock selection and placement. Rolling fields of a foreground plant like glosso, hair grass  or Heminanthus cllitrichoides (which is starting to make the rounds here in Houston) and perhaps a thin leafed background plant like Eleocharis acicularis. Fish would be simple too, a larger school of tetras (100ish) and a mop crew of a small pleco, oto’s, and shrimp.

          I realize the plan is still a bit broad and I am comfortable with my ability to adapt to what I am suggesting, but I really need to get a feel for what’s available locally, investigate what I can get off the internet (plants perhaps – fish no) and formulate a final plan. The plan will be placed in this order:

          Focal point – driftwood or stone
          Plants
          Fish

          Given previous experiences, I suspect in is going to take a month or so to get the focal point and plants in order and then it’s a waiting game for the right fish to trickle into the LFS.

          Comment


          • #6
            Re: William's Plant Tank Adventure/Journal

            looking great dude ! keep it coming.
            Checkout my blog AquaMusing
            sigpic

            Comment


            • #7
              Re: William's Plant Tank Adventure/Journal

              for real....I know there are more of us reading this journal!  CAnt wait to see more pics and progress
              ADA mini-m planted
              ADA mini-m riparium
              ADA 30-C nano reef
              ADA 90-P community Tanganyikan
              ADA 120-p overflow Full reef in progress
              Eheim 90cm SA biotope
              110g Peacocks

              Comment


              • #8
                Re: William's Plant Tank Adventure/Journal

                Sounds like fun!!!

                If you are patient enough lay your substrate like you want it and fill it with water before adding plants. keep it like so for about a week or two with daily water changes throughout.

                ADA soil spikes ammonia to help the cycle and it also lowers pH/KH to really low numbers before leveling out so the plants(most likely from hard water) will go into shock and melt.


                If you want to do driftwood look up http://www.manzanita.com/ they sell packages that are cheaper and would fit the bill better, just give them a call(from what I hear, just call and tell them what you are looking for or order the sample pkg).


                Can't wait to see some pictures of it's progress! and welcome to the box!
                700g Mini-Monster tank

                Comment


                • #9
                  Re: William's Plant Tank Adventure/Journal

                  WOW. Your fingers must be killing you after that much typing!  I love how much effort you're giving the asthetics of the set up.

                  You'd never know how big that tank was in the picture. The photo with the bags of soil in it, Id swear that was about 75 gallons and full of small bags. Can't wait to see it full of plants for scale.
                  "Those who would give up Essential Liberty to purchase a little Temporary Safety, deserve neither Liberty nor Safety" -- Benjamin Frankli
                  n

                  Comment


                  • #10
                    Re: William's Plant Tank Adventure/Journal

                    Very informative information you posted. This will be a great learning experience, cant wait to see the outcome

                    Comment


                    • #11
                      Re: William's Plant Tank Adventure/Journal

                      Great project!  :)

                      So are you nixing the Angels?
                      "Millennium hand and shrimp!"

                      Comment


                      • #12
                        Re: William's Plant Tank Adventure/Journal

                        EK,

                        Thanks for the insight - Danny and Navarro conveyed the same experience - pH/KH craters and advised 50% water changes for a few weeks until things stabilized. I have been pondering setting up the aquascape (minus plants), let it run it's course for a few weeks then drain plant and refill. Any thoughts or feelings on this approach?

                        Thanks for the link. I'll have to send them an email. Another lead may be:  www.adriftwood.com/

                        I sent them an email last night explaining what I needed and they promptly called me back today. After a lengthy conversation with Ernie explaining what I want he seems more  than willing to hit some of the local lakes and look for branchy/wispy pieces.  

                        MZ,

                        I haven't nixed the Altums yet. If I have to Iwagumi tank then yes large fish like Altums or Discus are out; however, if I can get my hands on some decent driftwood, Altums are back in the mix.

                        Best regards,

                        William

                        Comment


                        • #13
                          Re: William's Plant Tank Adventure/Journal

                          very nice tank keep us update with the nice set up.
                          180 gallon RR wild discus, harlequins, congos, rainbow, pleco, cardinals, rummynose, rcs, and amanos.  2260 eheim pressurize co2 4x54 tek lights

                          Comment


                          • #14
                            Re: William's Plant Tank Adventure/Journal

                            Most that have been using AS have had much better start with the week or two worths of water changes to help stabilize the tank. I do 50-90% water changes the first week and usually that is enough to get it going, my last two tanks went perfect after the first week and adding a seeded filter or some sort of initial beneficial bacteria really helps with it all.

                            Also don't forget the seachem purigen.......none of my tanks go without it! it's miracle in a bag!

                            If you wanna check out some wood fish gallery has some decent pieces of manzita but it's really pricey.

                            Navarro knows his stuff so his advise should be taken into consideration!
                            700g Mini-Monster tank

                            Comment


                            • #15
                              Re: William's Plant Tank Adventure/Journal

                              Awesome journal William! That is some intensive time you have invested there.

                              From personal experience, I would add the plants from the very beginning. They will utilize the massive amount of nutrients you will have in that tank when you fill it up which should help keep algae problems to a minimum.

                              If you do decide to go iwagumi, visit www.nepco.cc/ in SW Houston. They have some really nice rock, and are some great people to work with.

                              Comment

                              Working...
                              X